Import Data to Nonprofit Vertical CRM
How Can I...
Importing records from external sources to Nonprofit Vertical CRM is one of the most important lead creation activities for marketing and sales. In Nonprofit Vertical CRM, importing records help you to create new leads by gathering data through various sources, such as purchasing a record database, records from different business units, etc. You can import records with the help of two features:
Import My [Module] - Use this feature to import the records owned by (assigned to) you. By default, the records' ownership is automatically assigned to the user who imports the records.
Import My Organization [Module] - Use this feature to import all the records that are owned by (assigned to) the users in your organization, including the records owned by you. While importing, the import file should have a column that contains the exact email address of the users to whom you want to assign each record.
Import Checklist
Before importing the data, please go through the following checklist:
- PermissionMake sure you have the access and privilege to Import data. If you do not have the privilege, the Import link will be hidden in your User interface.
- File FormatThe files to be imported must be in a CSV (comma separated values) file format. It must be an ASCII file (usually with a .txt or .csv extension in the Windows environment) where each line of text represents a single record. The supported formats are Excel (XLS, XLSX), Comma Separated Value (CSV) and Business Card or vCard Format (VCF). All file attachments should be separated from the data.Unexpected errors may occur if the XLS/XLSX files contain any special controls such as combo filters or images embedded in it.
- Forbidden CharactersAny data for the file to be imported should not contain the following characters:
- Double quotation marks(") - use only as a field delimiter
- Vertical bar (|)
- Angle brackets (<>)
- Double quotation marks(") - use only as a field delimiter
- Mandatory FieldsThe required (mandatory) fields must contain a value. Make sure you do not leave the mandatory fields blank, in the import file. For instance, when you are importing account information, each account record must include an Account Name. The Field Mapping page in the Import wizard shows the required fields in the * format. Do not proceed to the next step without mapping the mandatory fields.
- Check box DataMake sure that the data you plan to import from Boolean or check box fields contain values that will properly convert during the import process.Imported data from Boolean and check box fields are converted as follows:
- If check box is selected - True or 1
- If check box is not selected - False or 0
- If check box is selected - True or 1
- Drop-down ListAll data values displayed in the drop-down lists must exist in the corresponding Nonprofit Vertical CRM CRM fields.For instance, if you plan to import account information that contains a value for the industry type drop-down list, before you import the account information, make sure all the industry values in the source file already appear in the drop-down list. If the values do not exist, you must either change the values in the source file to match the existing values in Nonprofit Vertical CRM CRM, or have your administrator add the new values.
- Field NamesMake sure the first row of data (records) in the source file contains the column headings or field names rather than the actual data values. These heading field name values help identify the data when you map the new data to the existing fields in Nonprofit Vertical CRM CRM.
- Blank LinesRemove all blank lines from the file to be imported. A blank line is interpreted as the end of the file.
- User NameWhen imported records are assigned to other users also, you need to map the Owner field with the appropriate field from the import file. While importing, the import file should have a column that contains the exact email address of the users to whom you want to assign each record. Only then will the records automatically get assigned to the respective users while importing.
- File SizeMake sure the file size (Import data) does not exceed 5MB.
The modules for which you can Import data along with their mandatory fields are mentioned in the table below:
| Modules | Mandatory Fields | Modules | Mandatory Fields | Modules | Mandatory Fields |
| Leads |
| Potentials |
| Products |
|
| Accounts |
| Cases |
| Vendors |
|
| Contacts |
| Solutions |
| Price Books |
|
| Campaigns |
|
Import Limits
If the import file is in XLS, XLSX or VCF format, you can import a maximum of 5000 records/batch. Records more than 5000 can be imported in CSV format. Check the Feature Availability table for Import Limits.
Import Data
Use the Import My [Records] feature to import the records owned by (assigned to) you. By default, the records' ownership is automatically assigned to the user who imports the records.
Use Import My Organization [Module] feature to import all the records that are owned by (assigned to) the users in your organization, including the records owned by you. While importing, the import file should have a column that contains the exact email address of the users to whom you want to assign each record. Only then will the records automatically get assigned to the respective users while importing.
To import data
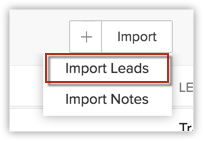
- Click the [Module] tab.Module refers to the tabs like Leads, Contacts, Accounts, etc.
- In the [Module] Home page, click Import.
- In the Import [Module] page do the following:
- Choose Import My [Records] or Import My Organization [Records].
- Browse to locate and select the required file that is to be imported.
- Select the check box to Enable Manual Lead approval.The records will be manually approved by the admin before being assigned to specific users. This option is available only while importing leads. See Also Approve Records
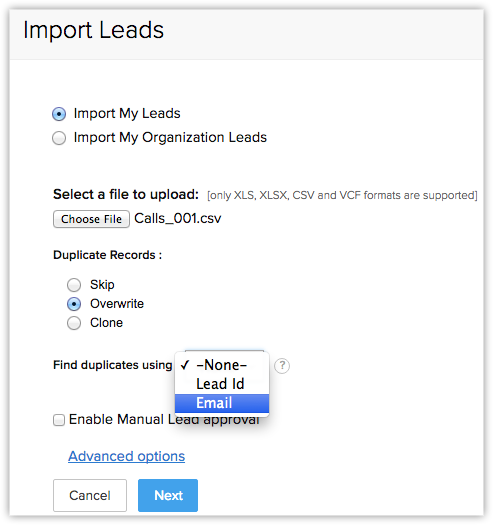
- Select Skip, Overwrite or Clone for duplicate records. (Refer notes below)The skip and overwrite option is available only in the Paid Editions.
- Choose Import My [Records] or Import My Organization [Records].
- Choose a field from the Find duplicates using picklist field. (Refer notes below)The field you choose here will be used by Nonprofit Vertical CRM to compare the existing records with those in the import file. On identifying matching records, Nonprofit Vertical CRM will reject, overwrite or duplicate the records based on your choice.See also: How to mark a field as a Unique Field
- Under Advanced Options, do the following:
- Select the Character Encoding from the list.
- Select a Workflow Task, if required.Note, that the work flow task will be available in the list only if you had already created a work flow task.

- Choose the DateandTimeformat for the date and time values in the import file.
- Select a rule from the drop-down list to Assign [Record] Owner as per the Assignment Rule. This option is available only when you Import Organization's record.Based on the rule, records will be assigned to the users. With assignment rules you can implement the Round Robin method to assign records to the users. See Also Assignment Rules
- Select an option from the list to Assign all imported Leads to this Lead Source.This option is available only while importing leads.
- Click Next to continue.
- Select the Character Encoding from the list.
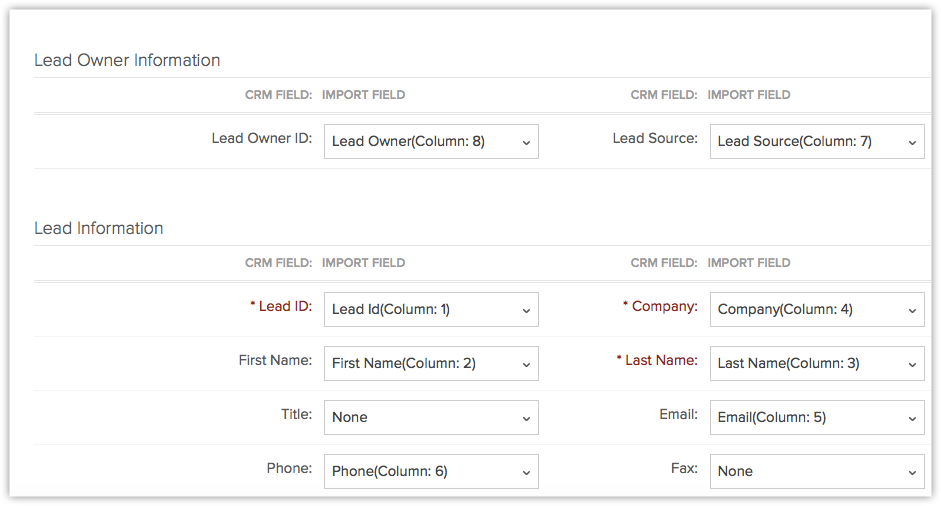
- In the Map Fieldssection, do the following:
- Associate the fields in CSV/XLS file column header with the corresponding [Module] fields in Nonprofit Vertical CRM.(Mandatory fields should be properly mapped)
- Click Next to continue.
- In the Confirm Mapping section, verify whether all fields are mapped correctly.
- Click Import.When the process is over, the added, updated and skipped records will be listed for your reference.
| Record C | Record B | |
| Skip | Imported | Not imported, as it already exists in Nonprofit Vertical CRM. |
| Overwrite | Imported | Imported. If the mapped fields' values differ in the existing record, they are replaced with the ones in the import file. Additional new data is added to the record, if the related field is mapped before importing. |
| Clone | Imported | Imported and another record B is created along with the existing one. |
- When the Overwrite option is selected, the duplicate records will be identified based on some fields for each type of record. Following are the fields for each type of record:
- Leads - Email
- Contact - Email
- Account - Account Name
- Potentials - Potential Name
- Cases - Subject
- Solutions - Title
- Campaigns - Campaign Name
- Vendors - Vendor Name
- Products - Product Name
- Leads - Email
- When the above mentioned fields are not mapped, duplicate records will not be identified, causing duplicates to be created in Nonprofit Vertical CRM.
- In case of duplicate records, only the fields that are mapped will be overwritten.
- When you do not use the above mentioned fields and still want to check for duplicate records while importing, then you can use the Record ID. Each record in Nonprofit Vertical CRM has a unique ID. When you export the records, you can get their individual Record IDs. See Also Knowledge Base
Import Notes
Many a time, you may face the need to write down notes for a lot of records at the same time. Sometimes the same note may need to be associated with multiple records. In such a case, it is a hassle to open each record and associate the note to it.
You can overcome this hassle by using the Import Notes feature offered by Nonprofit Vertical CRM. Simply export your existing records to a spreadsheet, add your notes in new columns and import the notes.
To import notes
- Prepare your spreadsheet (either exported from CRM or a new sheet) with your notes for each record. Make sure you have the Note Title and Note Content columns in your sheet. Apart from these two columns, the spreadsheet must a column for one of the unique fields for the chosen module - Email, Record ID or any other unique field.

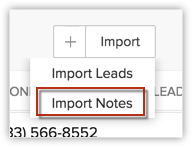
- In your Nonprofit Vertical CRM account, click the required module.
- Click Import > Import Notes.
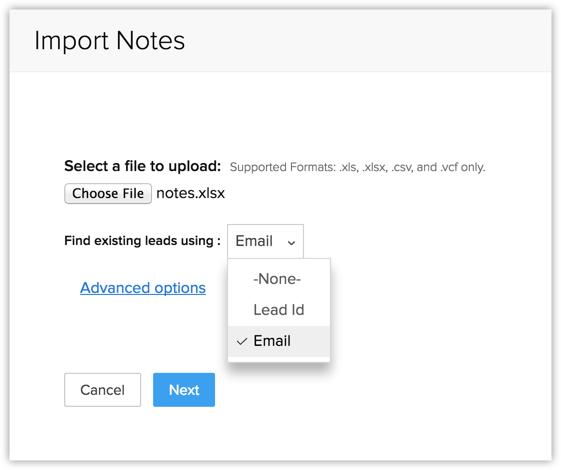
- In the Import Notes page, choose the file you have prepared.
- In the Find existing [records] using field, specify how you want CRM to determine the parent record to which the note will be associated - either Record ID or Email.For example, if you choose Contact ID while importing notes for contacts, CRM will associate the note to the contact with the Contact ID specified in the sheet.
- Click Next.
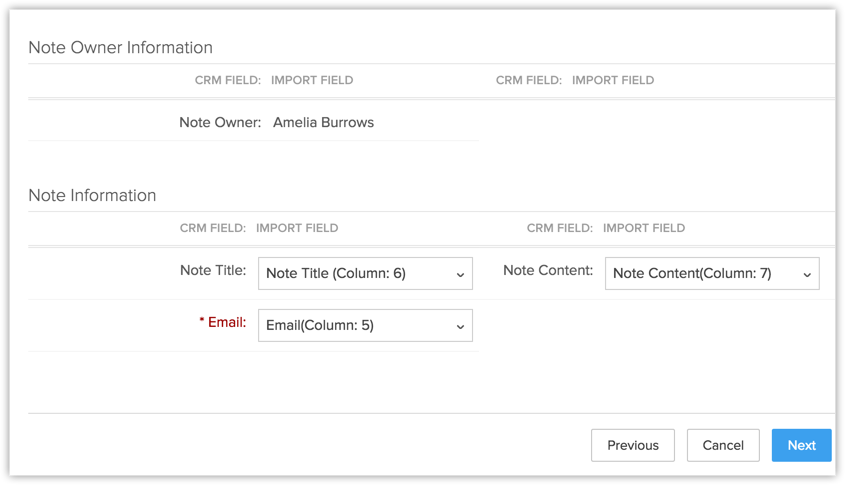
- In the Import My Notes Wizard, under the Note Information section, map the CRM fields, Note Title, Note Content and Email (or any other unique field that you have selected) with the import fields from the sheet.
- Click Next.
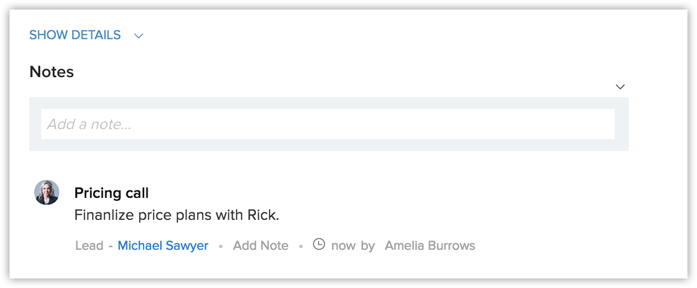
- In the Confirm Mapping page, click Import.The notes are imported and can be seen in the respective record's details page.

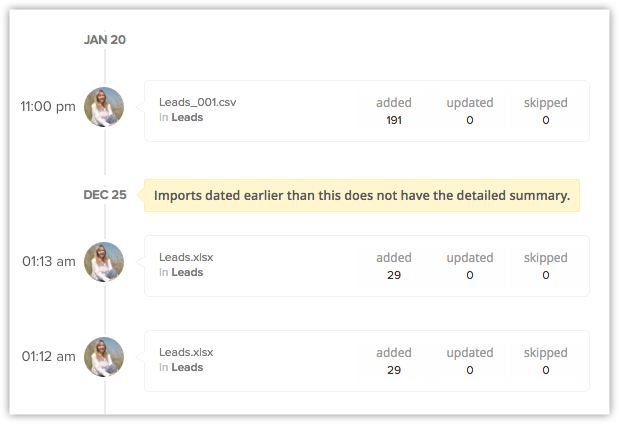
View Import History
Maintaining a log of the activities performed in your Nonprofit Vertical CRM account is always useful. You know when a record was edited, or who added a record. Similarly, a log of the import activities is also useful in knowing who imported records, when it was imported and whether the records were properly imported or not. The Import History page in Nonprofit Vertical CRM provides a clear picture of the recently imported files using the Import as well as the Migrate features. You can see the following details under the import history:
- Imported file name
- Module's name to which the records are imported
- The user's name who imported the records
- Imported date and time
- Details on the number of records that are added, updated and skipped
In the Import History page you can perform the following operations:
- Check details of the import
- Confirm the imported data
- Undo the data import
Files imported within the span of 60 days will be listed under Import History. Each entry in the imported history gives you the option to view the records that were added, updated and skipped. These details are available only for 7 days from the day the records are imported after which you can only see the number of records that were added, updated or skipped.. In case the records are not imported properly and you want to undo the import, you can do so within 30 days, after which the import action will be locked and confirmed automatically.
Check the Import Details
On importing a file, the import details will be listed under the Import History. This includes the date and time when the records were imported, user's name who imported the file, details on the number of records that were added, updated or skipped, details on why records were skipped, etc.
To check the import details
- Click Settings > Setup > Data Administration > Import > Import History.
- In the Import History page, every import action will be recorded along with the details on the date and time that it was imported.
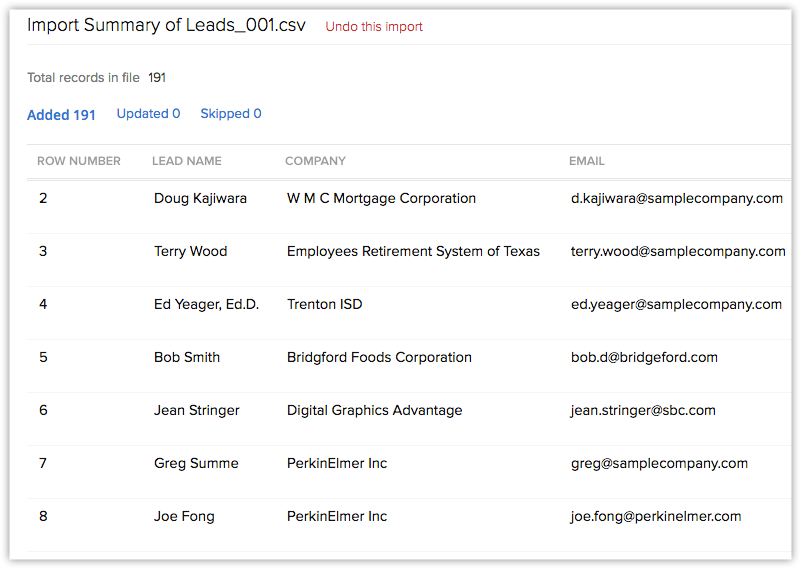
- Click on the added link to check the records that were added on importing.The fields in the import file will be listed, along with the values for each record.
- Click on the updated link to check the records that were updated on importing.The fields in the import file will be listed, along with the values for each record. The row numbers help you easily locate the records in your import file.
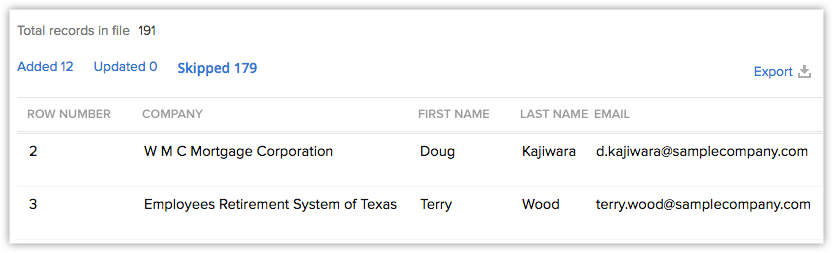
- Click on the skipped link to check the records that were not added in Nonprofit Vertical CRM.The fields in the import file will be listed, along with the reason why the records were not imported. The row numbers help you easily locate the records in your import file.
- Click on the Export link and get a copy of the skipped records and the reason why they were not imported.
Confirm or Undo Imported Data
Within 30 days from the import, one can undo the import process and remove the imported records from Nonprofit Vertical CRM. For security reasons, you may want to lock the imported records so that one does not remove the records that were imported. This is where the Confirm option is of use. After importing the data into Nonprofit Vertical CRM, confirm the operation if you are satisfied, so that the data will be permanently added to your CRM account.
To confirm or undo the import activity
- Click Settings > Setup > Data Administration > Import > Import History.In the Import History page, the import entries are listed.
- Move your mouse pointer to an entry. Do one of the following:
- Click
 to confirm the import.
 - Click the Undo this import link to undo the action and remove the imported data.

- Click
Related Articles
Nonprofit Vertical CRM Common Operations
How Can I... · Navigate Records · Search Records · Create Records · Create Records Individually · Import Records · Capture Records from Website (Using Web-to-record Form) · Export Records · Print Records · Restore Deleted Records · Merge Duplicate ...Setting Up Nonprofit Vertical CRM
Setting up Nonprofit Vertical CRM for your Organization The Setup page in Nonprofit Vertical CRM helps you configure all settings necessary to get your CRM up and running. Be it personalization, automation or third-party integrations, you can ...Viewing Import History
Maintaining a log of the activities performed in your Nonprofit Vertical CRM account is always useful. You know when a record was edited, or who added a record. Similarly, a log of the import activities is also useful in knowing who imported records, ...How can I associate contacts with their respective accounts while importing them through a single import file?
While importing the accounts and contacts using a single file, you can associate your contacts with the respective accounts. Your import file may contain both the contact and account details. You need to follow these steps: Copy the Account ...Checking Duplicate Records in Nonprofit Vertical CRM
When you have hundreds and thousands of records in your CRM, as your business grows, it becomes a very difficult task to check for duplicates. Nonprofit Vertical CRM helps you arrest duplicates even before they can be created, with the help of what ...