- Entering data in the proposal details form: You can manually fill in the details gathered from various external sources.
- You can gather datathrough various sources and import the CSV and XLS files into Nonprofit Vertical CRM.
- On lead conversion, contacts, accounts and deals can be created.
Create Proposals Individually
You can create proposals individually by:
- Filling in the details in the proposal creation form.
- Cloning the proposal with a few changes from the existing deal details.
To create proposals individually:
- In the Proposals module, click New Proposal.
- In the Create Proposal page, enter the proposal details.
- Click Save.
To clone proposal:
- In the Proposal tab, click a particular proposal that is to be cloned.
- In the Proposal Details page, click More icon > Clone.
- In the Clone Proposal page, modify the required details.
- Click Save.
Switch between Proposal views
The Proposal module offers two types of views - List view and Stage view. While the list view displays all the deals one after the other in the order you have sorted them, the Stage view categorizes the deals based on the Proposal Stage.
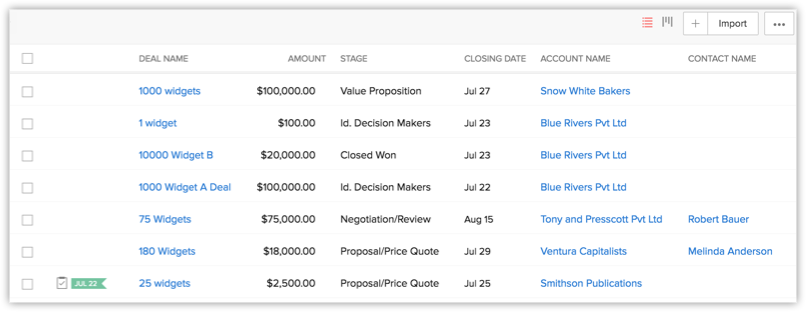
List View
Stage view
The Stage view is helpful when you specifically want to see view proposals categorized by their stages. A single glance at the Stage view will tell you which proposals are in the Closed Won stage, how many in the Closed Lost stage, Negotiation/Review stage and so on and so forth. This view is also applicable when you customize the Proposal Stages.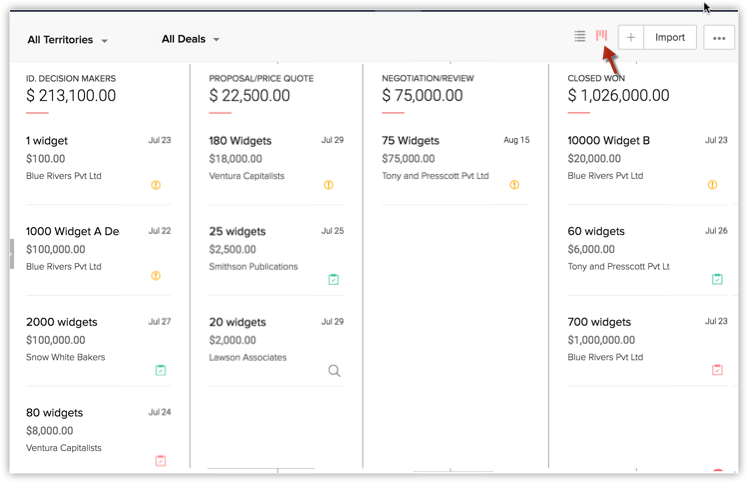
- Proposal Name
- Proposal Amount
- Account
- Closing date
- Proposal owner (on mouse-hover)
- Open activity associated with the proposal
Clicking on the proposal will take you to the proposal details page.
Working with the Proposal Details page
- Click the Proposals module.
- Click the desired proposal from the Proposal list view.
- You will see the details page of the proposal.
- Switch between the Info and Timeline views.
- Info - Displays related lists and links associated the proposal.
- Timeline - Displays a history of actions performed on the proposal's details page (in the last six months).
- Edit - Allows you to edit the record.
- More icon - Displays further options that you can perform for the account.
- Business card view: View top 5 fields related to the account.
- Related Lists Section- Navigate to the desired related list from this section. You can add a new related list as well as add new entries to anexisting related list from this section.
- Quick stage-update section - Update the Stage and Closing date of a proposal quickly using the quick stage-update section.
- View related information such as Next Action and Contact details.
Associate Proposals with Other Records
You can create a 360-degrees view of the proposal to display all the associated details, such as open activities, history of the completed activities, contacts, products, sales stage history, attachments, and notes.
In the Proposal Details page, you can update the following:
- Proposal Stage History: To view the history of the proposal stage
- Competitors: To associate competitors
- Attachments: To attach documents
- Notes: To add notes
- Open Activities: To create tasks and events
- Closed Activities: To display the completed tasks and events
- Products: To add products
- Quotes: To create quotes for the proposals
- Sales Orders: To create sales orders for the proposal
- Contact Roles: To select contacts associated with the proposal
- Emails: To send emails to the primary contact ofproposal
- Cases: To create cases

Map Contact Roles
To map contact roles
- Click the Proposals tab.
- In the Proposals Home page, select the required proposal.
- In the Proposal Details page, the contact details, if any, are displayed under Contact Roles section.
- Click Contact Name, Phone, Email, or Role Name links to sort the display order of the records.
- Click the relevant Remove link to delete the record.

- Click Add Contact Role.
- In the Contact Roles Mapping page, for each contact select the role from the Contact Role drop-down list.
- Select the check box(es) of the contacts that you want to add. To associate all the contacts, select the select all checkboxes.
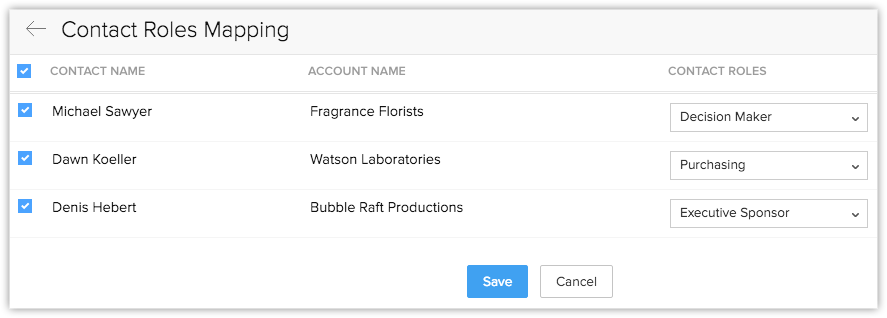
- Click Save.
Availability
![]() Profile Permission Required: Users with the Field-level Access permission in profile can access this feature.
Profile Permission Required: Users with the Field-level Access permission in profile can access this feature.
![]()
To customize contact roles values
- Log in to Nonprofit Vertical CRM with Administrator privileges.
- Click Settings > Setup > Customization > Fields > Proposals> Contact Roles.
- In the Edit Contact Roles page, do the following:
- Click Add Role or Delete Role links, if needed.
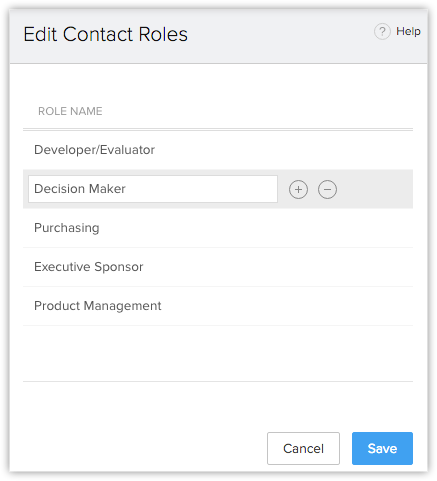
- Modify the existing roles from the Contact Role text box.
- Click Add Role or Delete Role links, if needed.
- Click Save after updating the contact roles.
Configure Sales Stage Picklist
- Click Setup > Customization > Fields > Proposals.
- From the list of Proposal fields, click the Edit link corresponding to the Stage field.
- Modify the existing details, and then click Save