Set up Twilio Integration
Twilio, the hosted PBX system integrated with Nonprofit Vertical CRM offers options to organize your organization's incoming and outgoing calls from within Nonprofit Vertical CRM. You can configure the Twilio set up to manage call and associate the calls with the leads/contacts/accounts in your CRM database. The Twilio Integration set up includes three steps:
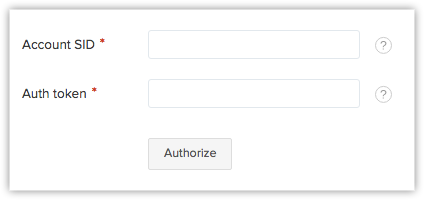
Step 1: Authorize Twilio
To authorize Twilio integration
- Go to Setup > Channels > Telephony.
- In the Nonpofit Vertical CRM PhoneBridge page, choose Twilio as the telephony provider.
- Specify the Account SID and AuthToken. You can find these details from the Dashboard of your Twilio account.
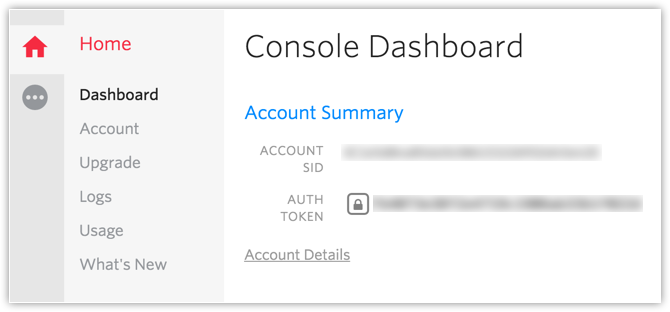
Enter the details and Click Authorize.
The Twilio account will be authorized. Refer to Steps 2 & 3 to configure incoming and outgoing numbers.
Step 2: Add Twilio Number for Incoming Calls
To add Twilio phone numbers for incoming calls
- Go to Setup > Channels > Telephony.
- Under the Incoming call tab, click Add phone number.
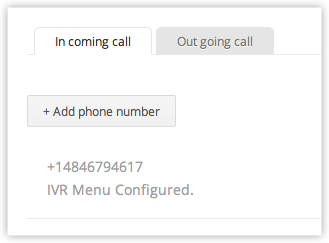
- Enter the phone number that you purchased from Twilio.
Select any one of the options. Based on this, the incoming calls will be channeled to members of your team.
- Configure IVR menu - Set up an IVR menu that will be played for the caller. Based on the options selected by the caller, calls will be directed to the specified users.
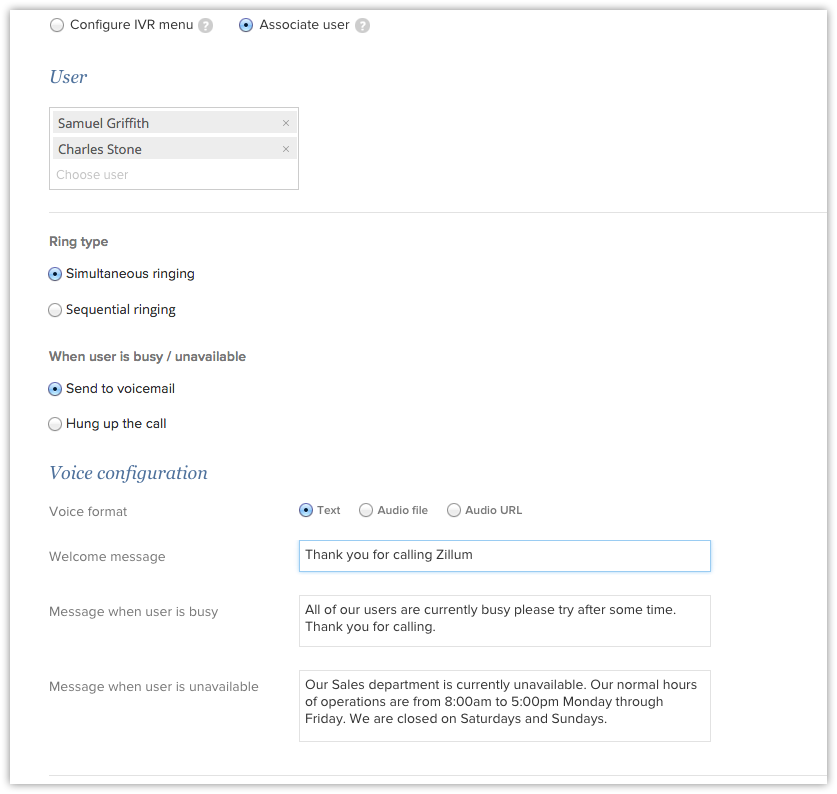
- Associate User - All the incoming calls to this phone number will be channeled to the specified users.
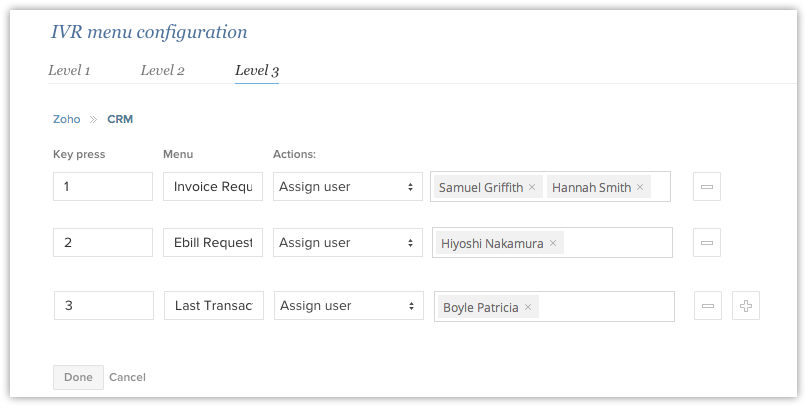
Option 1: Configure IVR Menu
Under IVR Menu Configuration section, do the following:
- Key Press - Specify a number between 1-9.
- Menu - Enter a menu option for the number.
Action - Select an action from the drop-down list (Assign User or Configure IVR Menu).
Assign User - Select one or more users from the list of active CRM users.
The call will be channeled to the selected users.
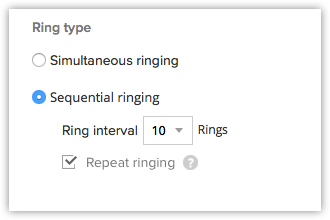
When multiple users are selected, you will have the option to specify the Ringing Type.
- Configure IVR Menu - Specify Key Press, Menu and Action to create sub IVR menu and click Done.
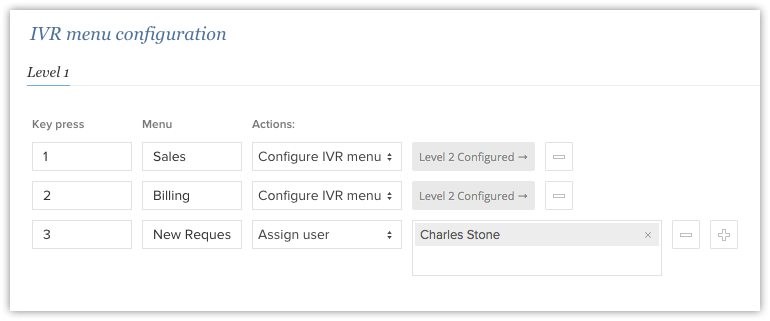
Click on the Add icon to add more menu options and repeat steps from 1.
You can add up to 5 levels in the IVR Menu.
Under IVR Voice Configuration section, do the following:
Voice Format- Select the voice format from the available options. Text, Audio or URL
- Text - Enter the message as text.
- AudioFile - Select the Audio file option to attach an audio file for the welcome message.
- Audio URL - Select the Audio URL option and Specify the URL of the audio file.
- Welcome message- Add a welcome message for the caller. Example: Thank you for calling Zillum Inc.
Menu message - Enter a menu option for the number. Also specify the format in which it needs to be read. Key and Menu variables will be populated automatically and cannot be removed.
Example: Kindly Select ${Key press} for ${Menu}.
Message when user is busy- Enter the message to notify callers when user is busy.
Example: All of our users are currently busy please try again after some time. Thank you.
Message when user is unavailable- Enter the message to notify callers when user is unavailable
Example: Our development team is currently unavailable.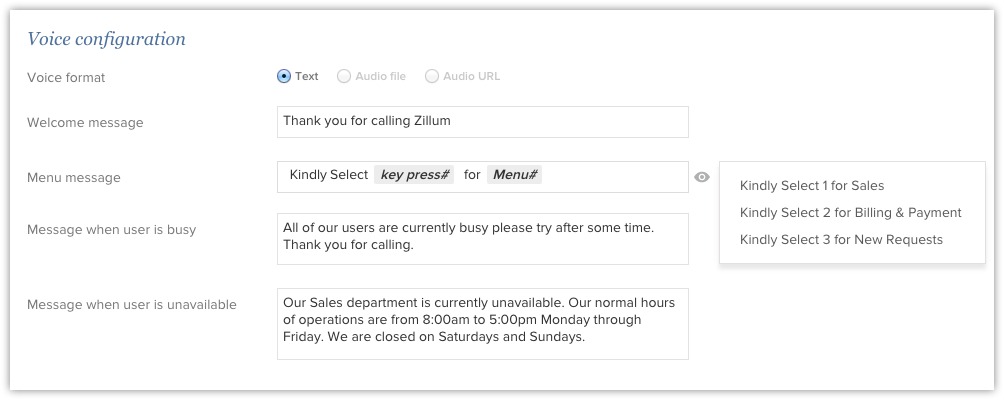
Call Queue- Using this option, you can queue up the incoming calls for the number configured. You can do the following while configuring the call queue option:
- Choose maximum callers to be queued. You can choose up to 25 callers.
- Set the maximum waiting time for the calls in the queue. Maximum time is allowed is 25 minutes.
- Choose the required music while the callers are waiting. You can select the default music or customized music. Enter the audio URL if you select customized music.
- Set an announcement message while the callers are in queue. You can choose from the list of available messages or customize your annoucement message based on your requirements.
- Set the frequency of your announcement message. You can set frequency up to 30 seconds.

- Call Recording: Click to enable call recording. Please note that additional charges may appear on your Twilio account if you choose this option.
- Click Save. IVR menu will be configured.
Note:
- You can set up to 9 IVR menu. In case of sub menu, you can add up to 5 IVR menu.
- For multi-level IVR menu, only Text voice format is supported.
- You can change the call status to On-line or Offline.
Option 2: Associate User
Select one or more users from the list of active CRM users.
The call will be channeled to the selected users. When multiple users are selected, you will have the option to specify the Ring type.
- Under the Voice Configuration section, you can choose the voice format, enter a welcome message, a message when user is busy and a message when user is unavailable for the caller as per your requirements. You can also manage calls under queue and record your calls, if needed.
Step 3: Add Twilio Number for Outgoing Calls
To add Twilio phone numbers for outgoing calls
- Go to Setup > Channels > Telephony.
- In the Zoho PhoneBridge page, under the Outgoing call tab, click Associate phone number.
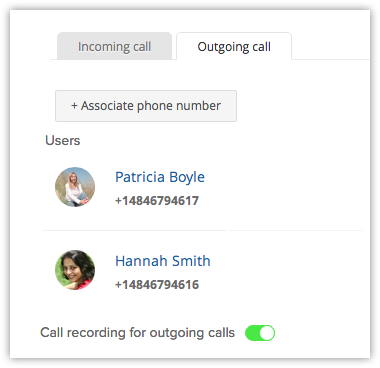
Select a user from the User drop-down list.
All the active users will be listed.
Select a phone number from the Phone Number drop-down list.
All the phone numbers that you have purchased from Twilio will be listed.
Click the Add icon to associate more users with phone numbers.
Based on this association, users will be able to make outgoing calls from their respective phone numbers.
- Call Recording - You can either enable or disable the call recording option. The recorded calls will be attached to the record under Notes.
- Click Save.
Use Twilio integration
Once your Twilio integration setup is ready, you can make outgoing calls, receive calls, and add follow-up activities inside your CRM account.
Incoming Calls
When you receive an incoming call from a CRM contact via twilio, you can see a Business Card view of the contact.
You can do the following while you receive calls inside your CRM via Twilio.
- You can put your call on hold by clicking the Hold icon. Click it again to resume your call, whenever required. Also mute your call, if needed.

- Add a call description if necessary, so that you use them for future references.
- Click End Call, once you have finished your call.
- Also, Add follow up activities (followup call or followup task) once the call is finished.
Outgoing Calls
You can make an outgoing call via Twilio inside your Nonprofit Vertical CRM account.
To make an outgoing call,
- Click the desired record.
In the Record's Details page, click the Phone icon beside the phone number.
The call will be now established.

- Add follow up activities (followup call or followup task) once the call is finished.

Follow-up activity
At the end of every call via Twilio, you can add a followup call or a followup task from the Call Ended window in Nonprofit Vertical CRM. These will be automatically associated to the respective record.
Edit or Remove a Phone Number
From the list of incoming and outgoing phone numbers, you can edit or remove them whenever required.
To edit or remove a phone number
- Go to Setup > Channels > Telephony.
- In the Nonproft Vertical PhoneBridge page, the phone numbers added will be listed.
- Click the Incoming calls or Outgoing calls tab.
Move the mouse pointer to a phone number and click on any one of the links:
- Edit - In the Incoming tab, you can edit the details such as IVR messages, call recording options, automated messages when busy or unavailable, etc. In the Outgoing tab, you can edit the user and the phone number assigned to the user for outgoing calls.
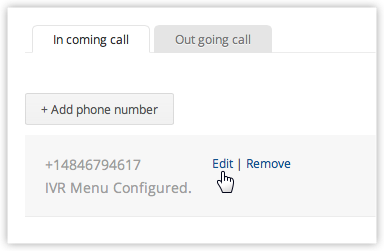
- Remove – In the Incoming tab list, this will disable all incoming calls for the phone number from within Nonprofit Vertical CRM. In the Outgoing tab, disable all outgoing calls for the user from within Nonprofit Vertical CRM.
FAQ
1. I am not able to make/receive calls from Nonprofit Vertical CRM. Why?
One of the major reasons you may not be able to make/receive calls is that you have browser compatibility issues. In this case, go to http://clientsupport.twilio.com/. During the check, if you see any red boxes, you need to report the error to Twilio. If all boxes are green and you hear a cowbell sound, then it means your browser is compatible.
Apart from this, following are the other reasons you may not be able to make/receive calls.
- You don’t have enough balance in your Twilio account to make/receive calls.
- Your browser does not have Adobe Flash Plugin installed.
- You have changed Voice URL or Status Call Back URL for Twilio PhoneNumber or TWIML application (named Nonprofit Vertical CRM) in Twilio. Do not change them.
- If you have changed the phone number properties but could not revert to default, then please delete the phone number and add it again.
Make sure you rectify these and try again.
2. Why do I get the number, '266696687' as the Caller ID even though all the callers are different?
This is not a phone number, but a code that Twilio displays for any Anonymous call.
The Caller ID number that Twilio displays in your Call Logs is whatever the carrier sends them. Sometimes, the originating carrier for a call will pass through one of the following words. Twilio will convert these words to digits and uses those digits as the 'From' parameter.
- RESTRICTED: 737 874-2833
- BLOCKED: 256-2533
- UNKNOWN: 865-6696
- ANONYMOUS: 266696687
When you receive these numbers as the Caller ID, do not add it in Zoho CRM as a contact. If you do so, any other anonymous call (whose actual phone number is different) will be associated to the contact you add.
3. In sequential ringing, how does Nonprofit Veritical CRM decide who gets the call first?
The sequence depends on whoever signs into Nonprofit Vertical CRM first.
For example, Jim and Ken are two CRM users associated with a call. Jim signs in first and then Ken. So Jim’s position in the sequential ringing queue is 1. Ken’s is 2.
An incoming call is first routed to Jim. If he takes the call, his status changes automatically to “busy”. A second call that comes in regardless of whether Jim is finished with the first call or not, will now be routed to Ken. Now Ken’s position in the queue is 1 and Jim’s is 2, as Jim has answered the first call.
Note that the sequence changes only if Jim answers the first call. If he changes his status to “busy”, without attending a call, he becomes inactive in the queue but his position in the queue does not change. He will still be the first one to receive a call, when he comes back online.
4. What happens to a call if none of the users associated attend it?
Depending on the status of the users, the caller will be notified that the person they are calling is unavailable or busy. Following this message the caller would be requested to leave a Voice Mail. This message can be customized in Nonprofit Vertical CRM.
The call would then be shown under missed calls, along with the voice message, if there were any.
Read Format refers to the format in which the IVR menu message is read out. It could be one of the following:
Key Press followed by Menu
Example: Press 1 for English
In this case, you have to specify the Read Format as ${Key Press} for ${Menu}
Menu followed by Key press
Example: For English, Press 1
In this case, you have to specify the format as ${Menu} Press ${Key Press}