Creating Accounts
- Entering data in the account details form: You can manually fill in the Account details gathered from various external sources.
- Importing Leads from external source: You can gatherdatathroughvarious sources and import the CSV and XLS files into Nonprofit Vertical CRM.
- Converting Lead to Account: On lead conversion, contacts, accountsandpotentials can be created.
- Synchronizing Microsoft Outlook contacts: Synchronize the contacts in Microsoft Outlook with Nonprofit Vertical CRM. In special cases: An account will be created in Nonprofit Vertical CRM while the Company Name field is specified in the Microsoft Outlook
Create Accounts Individually
You can create accounts individually by:
- Filling in the detailsonthe account creation form.
- Cloning the accounts with a few changes in the existing account details.
To create accounts individually
- In the Accounts module, click (Add button) to add a new account.
- In the Create Account page, enter the account details.
- Click Save.
To clone accounts
- In the Accounts tab, click a particular account that is to be cloned.
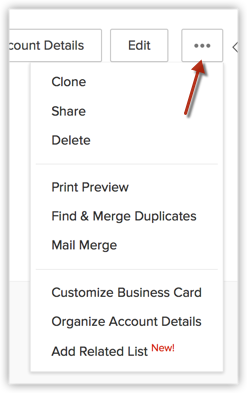
- In the Account Details page, click
 (More button) and choose Clone from the list.
 - In the Clone Account page, modify the required details.
- Click Save.
Work with the Accounts details page
Once you have created an account, you can view the details of the account in the record's details page. The details page of an account presents information related to the account - for example, potentials and contacts related to the account, activities, notes, events, emails and so on - in a single location.
To view the accounts details page
- Click the Accounts module.
- Click the desired account from the Accounts list view.
- You will see the details page of the account.
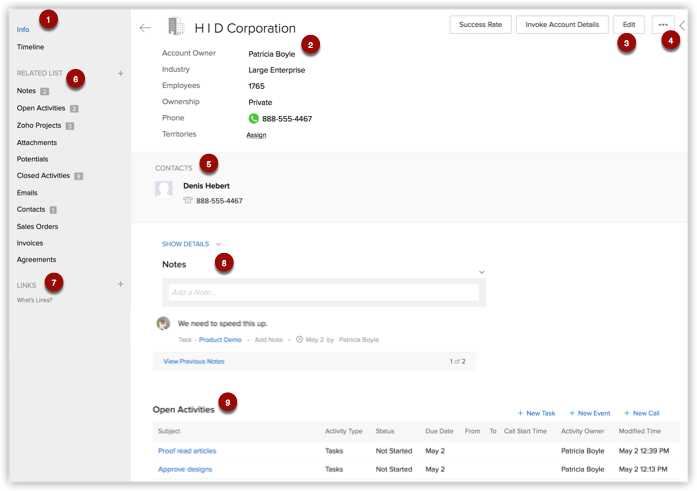
- Switch between the Info and Timeline views.
- Info - Displays related lists and links associated to the account.
- Timeline - Displays a history of actions performed on the account's details page (in the last six months).
- Business card view: View top 5 fields related to the account. You can customize the business card view an account.
- Edit - Allows you to edit the record.
- More icon - Displays further options that you can perform for the account.
- View related details - such as potentials and contacts related to the account.
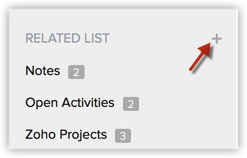
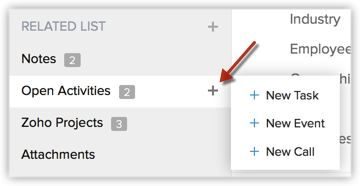
- Related Lists Section- Navigate to the desired related list from this section. You can add a new related list as well as add new entries to anexisting related list from this section.
- Custom links - View custom links associated to the account.
- Notes - View notes associated to the account. This includes check-ins made on your mobile app as well as comments made on a project's task.
- Related Lists- Scroll down to see all the related lists associated with the account.
Associate Account with Other Records
In the Account Details page, you can update the following:
- Potentials: To add potentials.
- Contacts: To add contacts.
- Open Activities: To add tasks and events (meetings and calls).
- Closed Activities: To display the closed activities.
- Invoices: To add invoices.
- Attachments & Notes: To attach documents and notes.
- Member Accounts: To add other divisions or subsidiaries to the parent account.
- Cases: To create cases
Add Member Accounts
Member Accounts are secondary accounts added to an existing parent account. This allows having separate accounts with different divisions within a parent company and provides a full view of the individual accounts as well as the consolidated accounts within the parent account.
To add member accounts
- In the Account Details page, the existing member account details, if any, are displayed.
- Click Account Name, Phone, Website, Account Type, Industry, or Annual Revenue links to sort the display order of the records.
- Click the relevant Edit or Del link to modify or delete the member account respectively.
- Click Account Name, Phone, Website, Account Type, Industry, or Annual Revenue links to sort the display order of the records.
- Click New.
- Enter the member account details.
- Click Save.
Related Articles
Creating Contacts
In Nonprofit Vertical CRM, you can create contacts by: Entering data in the contact details form: You can manually fill in the Contact details gathered from various external sources. Importing contacts from external source : You can gather data from ...Creating Dashboards
How Can I... Create Dashboards Add Components List of Standard Charts Drill Down Dashboards Add to Home Embed URL Add to Favorites The dashboard is a summarized view of the custom report data in Nonprofit Vertical CRM. It provides a platform for a ...Creating Custom Fields
How Can I... Custom Fields Custom Field Limits Add Custom Fields Edit Custom Fields Set Field Permission Mark a Field as Required Mark a Field as Unique Remove/Delete Custom Fields Create Currency Fields Add/Rename Pick List Values Replace Pick List ...Creating Formula Fields
Formula fields are used to calculate different types of values, including numeric values, text values, date values, etc. Formula fields and their resulting return value have certain data types associated with them and there are specific operators ...How can I associate contacts with their respective accounts while importing them through a single import file?
While importing the accounts and contacts using a single file, you can associate your contacts with the respective accounts. Your import file may contain both the contact and account details. You need to follow these steps: Copy the Account ...