Auto Response Rule for Web Forms
How Can I...
- Create Auto Response Rule
- Create Auto Response Rule Entry
The Auto Response rule feature enables you to send automated emails when leads,contacts, cases or records for the custom modules are generated through web forms. When a lead is generated through web forms, you may want to send appropriate emails to the leads with different types of requests. In such cases, you can create an auto response rule with specific rule criteria. When the condition is satisfied, the corresponding email is sent. You can create numerous auto response rules but only one auto response rule can be active at a time.
Availability
![]() Profile Permission Required: Users with the permission to create web forms can access this feature.
Profile Permission Required: Users with the permission to create web forms can access this feature.
Create Auto Response Rule
To create auto response rules for web forms
- Click Settings > Setup > Extensions & APIs > Webforms.
- In the Auto-Response Rules page, select the module from the drop-down list.
- Click Create Rule.You will be able to create the auto response rule for the selected module.
- In the Create Auto Response Rules for Web to [Module] page, do the following:
- Enter the Rule Name.
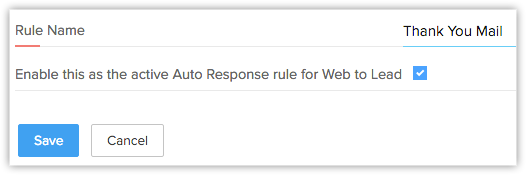
- Select the check box to activate the rule.
- Enter the Rule Name.
- Click Save.
Create Auto Response Rule Entry
To create auto response rule entry
- Click Settings > Setup > Extensions & APIs > Webforms.
- In the Auto-Response Rules page, click on the rule for which you want to create the rule entry.
- In the Auto Response Rules for Web to [Module] page, click Create Rule Entry.
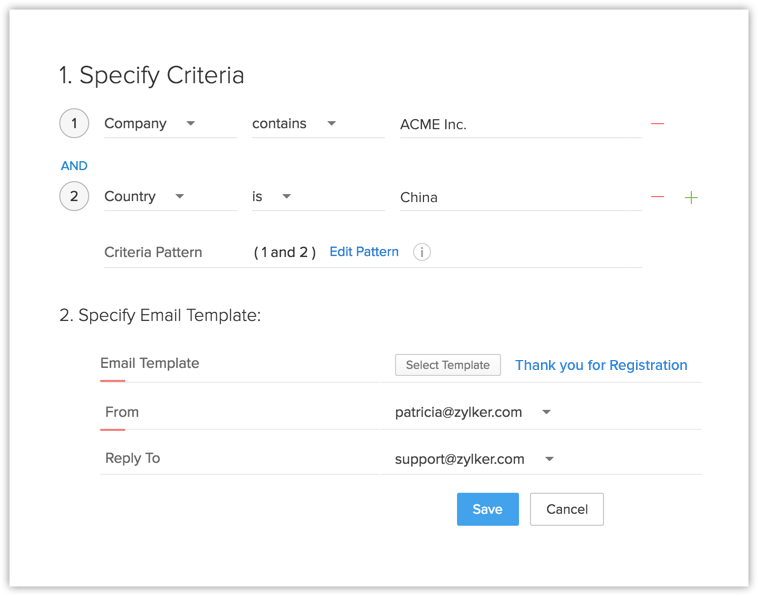
- In the Rule Entry page, do the following:
- Specify the Rule Criteria.
- Choose an Email Template from the drop down list or if you do not have email templates created for the module, you can click on the + Create Template link.
- Next you have to enter the email addresses in the From and Reply to fields.Here you can choose one of these option in the drop-down list:
- your account email address
- organization email address
- email address of the record owner
- other user's email address
- your account email address
- Specify the Rule Criteria.
- Click Save.
Related Articles
Setting up Web Forms
How Can I...up Generate Web Forms Step 1: Build a Form Step 2: Specify Form Details Step 3: Use Web Form Code to Embed Creating a web form involves three steps Building the form - Drag and drop fields to build a form and format it easily with the ...Nonprofit Vertical CRM Web Forms for Google Sites
Web forms simplify the process of capturing visitors' or users' information from the website into your CRM system. They are designed to automate importing of data from a website into Nonprofit Vertical CRM and to enable non-technical users to design ...Setting Up Giving Forms
Setting up Web Forms Creating a web form involves three steps · Building the form - Drag and drop fields to build a form and format it easily with the WYSIWYG editor. · Specifying the form details - Add details such as form name, landing ...Why are the leads captured through the web forms not visible under the Leads tab?
Leads captured through your web forms may not be visible under the Leads tab due to any one of these reasons: Use of HTTP - If you are using HTTP in your web form HTML codes, you need to change it to HTTPS. Default hidden fields - When the HTML code ...Can I capture Leads and Contacts directly from my website?
Yes, you can capture Leads and Contacts directly from your website using web forms.